Build it, print it, race it – the BIGTREETECH DeathRacer Kit puts you in the driver’s seat of high-speed 3D-printed action!
BIQU Airless Basketball
Bounce into the future with the BIQU Airless Basketball – cutting-edge design, perfect grip, and quiet play in three vibrant colors!
Pedestrian Push-Button
Bring the iconic Aussie crossing experience to your pocket with the Pedestrian Push Button Keychain – complete with authentic looks, sounds, and nostalgia on demand!
Placa de acelerómetro BIGTREETECH ADXL345/S2DW para correr Klipper
$29.51 USD$15.99 USD/Oferta
1030000156
11 reviews
Global Fast Shipping
Free Shipping USD $49+
180-days Warranty
Earn BQ Maker Coins to get cash discounts when buying this product
Introducción del producto
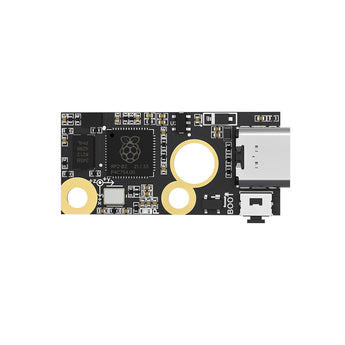
S2DW V1.0/ ADXL345 V2.0 es un módulo para compensación de resonancia de impresoras 3D. Puede comunicarse a través deUSB, simplificando enormemente el cableado.Tenga en cuenta: la versión del chip es la única diferencia entre ADXL V2.0 y S2DW.El S2DW V1.0 presenta el LIS2DW12TR, que ofrece las mismas capacidades de medición de aceleración que el ADXL345. Con mayor sensibilidad, menor ruido y estabilidad de temperatura mejorada, el LIS2DW12TR logra una precisión y consistencia excelentes.
Características
La placa tiene un botón de ARRANQUE reservado para facilitar las actualizaciones de firmware.
Los puntos de soldadura reservados permiten a los usuarios personalizar el cableado fácilmente.
El puerto USB tiene un chip de protección ESD adicional para evitar que la MCU se dañe por la electricidad estática a través del USB.
Asamblea
Nota: Evite apretar demasiado los tornillos durante la instalación para evitar daños.
Ejemplo usando Voron StealthBurner:
Método 1:
Instálelo en el soporte lateral con los orificios dobles (coincide con el espacio oficial).
Método 2:
Utilice tornillos a través de la PCB y el anillo de goma en el bloque calentador como se muestra.
I bought it and it works amazingly, i dont need to bother with an spi connection anymore
T
Tom L.
Works perfectly
After software install it has an automatic function in klipper establishing your printers shaper settings.
V
Ventis M.
Super easy installation
I did input shaping with this sensor on my RatRig V-Minion. Flawless indeed! Just attach to Control board pins, bolt unit onto relevant axis, push button on KlipperScreen and save configuration. Noticeable print quality improvement even BondTech extruder does a perfect job without calibration too.
I
Isaiah S.
Super easy
One of the easiest things I've installed and used on my printer
C
Charles M.
Great add-on for Klipper
This was a great add-on for my Klipper upgrade. The ADXL345 made input shaping easy and trouble free as I did not have to print parts and use a caliper to measure where the best print quality was. You connect the circuit board to the printer's motherboard or PI, connect it to the X axis and run the command and save the config when done. Repeat for the Y axis and you are done. Literally it is that easy.
I have come to trust BTT and will be using their products for upgrades to my two other printers as well.